
GPS and TOPO map Information
First things first, there are endless permutations of software, hardware and workflow for dealing with all of the GPS data, maps, imagery and other navigation goodies that are available to the geeked out outdoor enthusisant these days. I'm going to primarily describe my particular setup. Before digging into the geekery, let me give my pitch about outdoor navigation. GPS units are great, they help you keep track of where you are going and give many of us the confidence to venture out into areas we have never been. I am no fan of folks who will blindly upload a track into their GPS, strap it to the handlebar go follow the arrows. You must remember that you are only one set of dead batteries or a crash away from not having that gadget available to you. It is not a matter of if, but rather when and where it is going to fail you. Will you know what "point" you are at when that occurs? A compass, map and some orienteering skills will serve you well at that point.
GPS and Data TypesGPS Devices: There are no shortage of options here. My first GPS was the basic yellow Garmin eTrex which had no map features, just the basics. These days onboard maps as well as the ability to upload maps are pretty much considered to be a standard feature. I have used a Garmin eTrex, a Garmin Vista Cx and currently I use a Garmin Oregon 450. The Oregon has some nice features like being able to up load topographic maps as well as an altimeter and a bunch of other goodies. In addition Garmin also has the Edge series which is a marriage of cycling computer, heart rate monitor and mapping GPS. Smartphones like the Android based phones and the iPhone have internal GPS units as well as some mapping applications that allow you to use them. My personal opinion is that these smartphones are not really trail hardy devices unless you put them in some kind of case and the battery life is poor in comparsion to a dedicated GPS unit. . If I needed to buy a new GPS unit, today this would be the units on my short list. |
||||||||||
Maps Types: There are basically three types of maps that you will use. Maps on Your Desktop, Maps in Your GPS, and Printed Maps. In an ideal world one single software package would take care of all of those needs. I have found that unless you are willing to spending a lot of money it is tough to get a product that meets all of those needs easily. My setup is a combination of some of the least expensive options but not completely free. GPS Data Types: There are tons of formats that are often manufacture specific but there are a handful that are somewhat universal in nature for the basics of GPS and mapping data. The basic GPS data types are Wayppoints, Routes and Tracks. The GPX data format is pretty much considered the universal format. |
||||||||||
|
||||||||||
National Geographic's TOPO! Software
|
||||||||||
| NOTE: As of June 2015, I dropped support for the TOPO! format. The product was discontinued in 2012 and I have been mostly be using it to make the printable maps. I have since starting using open source mapping software like QGIS to make the maps. I will be providing GPS files in GPX and KML formats from here on out.
National Geographics TOPO! State Series It does have a couple of drawbacks. First it does not allow you to upload a freehand route to a GPS as a track. Related to this it does not allow you to export the freehand route as track in a GPX file. Only Waypoints and Routes can be exported. All versions of the software allow you to download a track from a GPS as a freehand route. Additionally, if you have version 4.2.8 or higher you can import a track from a GPX file as a freehand route. The second drawback is that while it is fairly easy to edit waypoints, and tracks in TOPO! there is not undo feature. Goof something up and you can find yourself redoing a lot of work. I mitigate this with lots of file saves and my workflow which I describe below. NOTE: Since I first started using TOPO! there have been some free updates provided for the software. One of those updates requires that old versions of the TOPO files be updated to the new format. There is a mixture of both formats on my site. I have been updating to the new formats as I update the trail maps. I have noticed that the conversion only works if you open up the TOPO program first and then open the data file. Double clicking on the data file to open the program does not do the conversion properly. I am currently using version 4.5.0. |
||||||||||
Google Earth
|
||||||||||
Garmin Mapsource
|
||||||||||
Maps for Mapsoure
|
||||||||||
|
||||||||||
Uploading Maps Trick: Be aware that when you upload a map to your GPS it stores everything you upload into either internal memory or a microSD card. This data is stored in a folder called Garmin with a file name of GMAPSUPP.IMG. When this upload occurs it erases your old mapset that was loaded. Most of the time it is no big deal, but I like putting the maps in my GPS and forgetting about them. Here is a method to keep multiple mapset on the GPS. First you will need to have a GPS unit that supports USB Mass Storage Mode. Plug the GPS into the computer then do the following your GPS (directions are for most Garmin units). Navigate to Main Menu --> Setup --> Interface. Verify you are connected then select USB Mass Storage. You will now have a screen icon that shows a GPS plugged into a computer. Shortly thereafter you will have a removable disk drive available to view in your computer. (My Computer for the PC folks) Open the drive and the Garmin folder. The current mapset will be named GMAPSUPP.IMG. Reename it to something else like GMAPSUPP-CA.IMG. Exit out of USB Mass Storage Mode. Then upload your new mapset to your GPS. Whenever you want to switch out mapsets all you have to do is get to any computer, go into USB mode and rename the files around to whatever active set you want to use. There is no need to mess with Mapsource and have to deal with reuploading maps later. When done renaming, exit out of USB mode, cycle the GPS power and you are now running on the different mapset. As a point of reference, I currently have CA as my active mapset, but I have AZ, WA, and Japan loaded on the card. The file names are GMAPSUPP.IMG, GMAPSUPP-AZ.IMG, GMAPSUPP-WA.IMG, and GMAPSUPP-JP.IMG. NOTE: My current GPS (Oregon 450) does not have this issue and awill recognized the different filename that I have above and allow me to switch them on and off. |
||||||||||
GPSBabel and GPS Data Workflow
|
||||||||||
 |
||||||||||
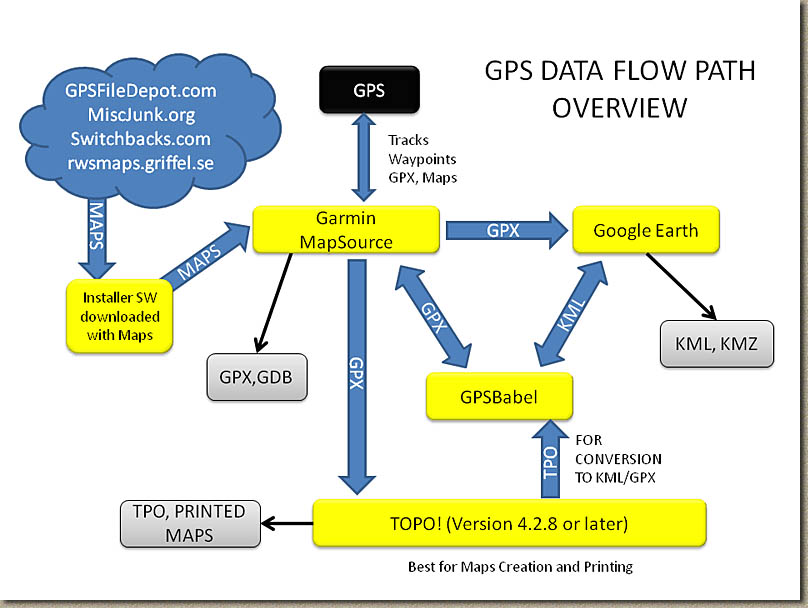
The items in gray are the "products" available for download on the site. Notice that the only way "the products" gets finished from its"native" software. Even though GPSBabel can convert directly from TPO to KML, I still open it up and make sure it looks right in Google Earth. NOTE: As mentioned above, I have dropped support for the TOPO! format. One thing to also note with GPSBabel is that while it can read and convert TPO files from TOPO! into numerous formats, it can not write into that format. One arrow I did not show on the flow diagram was that GPSBabel can convert to GPX and you could directly import it into TOPO! However one nice feature of Garmin Mapsource is that you can weed out multiple tracks in the file and then export out just the one track that you interesting in importing into TOPO!. When I was working on the Big Laguna Trail Map, it took several rides out there to get to all of the trails. Mapsource allowed me to chop up the various sections of the ride so that I could save just the new stuff as a GPX file and then import that into my ongoing TOPO! project for the Big Laguna Trail Area. Here is an example in which I used Google Earth and TOPO! together. In May of 2006, I rode Iron Mountain, but forgot to bring along my GPS. When I got home I discovered that there was absolutely no trails shown on the USGS maps in TOPO! for Iron Mountain. However, the entire trail system was easily discernable from the aerial photo of Iron Mountain in Google Earth. I zoomed in and drew in the trail system in Google Earth. Once done drawing the trails, I saved them as a KML file, converted it to GPX using GPSBabel and then imported it into TOPO! |
||||||||||
Distance Accuracy with long trips with a lot of elevation changes
|
||||||||||
The Side-Hill Effect
|
||||||||||
Intellectual Property Note
|
||||||||||
Links you might find Helpful
|
Delorme's TopoUSA - This is software package that offers electronic maps with GPS intergration. While some people love it, I'm no fan. |
|
| TOPOFusion.com. This is a software package that looks really interesting, but since I already have a "system", I'm in no rush to check it out. But you should. | |
| GPS File Depot - This site is simply awesome for getting opensource Garmin Mapsource Maps | |
| Here is tutorial from GPS File Depot on how to upload maps from Mapsource into your GPS. | |
Peter Bennett has an extensive links page pertaining to freeware mapping/cartography software. Good information, and it will allow you to do integrate you GPS and TOPO maps for next to nothing. However I find it rather time consuming to go this route. |